
Recently, I have been spending a lot of time developing some new automation functionality for my Dynamic Content Gallery plugin, working out how best to get the plugin to use WordPress’ Featured Image functionality and to automatically create the correct additional image sizes when adding and uploading images via the WP Admin UI.
During this work I discovered, perhaps to my shame, that I didn’t know quite as much about Media handling in WordPress as I thought I did. I also found out that, sometimes, WordPress does not behave as intuitively as one might expect or, to be more precise, certain behaviours are not so obvious as one might think – such as how best to use the WordPress add_image_size() function to create additional image sizes.
The purpose of this article is to give detailed information on how to use Featured Images and the add_image_size() function and, with examples, demonstrate the consequences of using the various cropping and resizing options available in this function. At the same time, I thought it would be useful to take another look at how WordPress handles uploaded images and its default image sizes.
Article contents
There’s a lot of information in this long, long article, so here are some links to help you navigate around it!
- WordPress Media basics – image handling
- Featured Image basics
- Using add_image_size() to customise the Featured Image
- Examples using add_image_size()
WordPress Media basics – image handling
It’s essential to understand the main aspects of the way WordPress handles media images before we look at the Featured Image functionality and the use of additional image sizes added via the add_image_size() function…
Default image sizes
Whether you upload an image via the Media Uploader (Add Media button) in the Post Editor, or directly into the Media Library via the Dashboard > Media > Add New panel, WordPress automatically creates several versions of the image during the “crunching…” phase of the upload process, and places these versions on your server:
- Thumbnail size
- Medium size
- Large size
- plus the Original image, if larger than the Large Size dimensions
The dimensions of these default image sizes are set in the Dashboard > Settings > Media options (see screenshot) and, by default, are set as follows:

- The default Thumbnail Size is 150px x 150px (with a cropping option, which we will discuss later on)
- The default Medium Size is max width 300px, max height 300px
- The default Large Size is max width 1024px, max height 1024px
Understanding the Media Settings size options
WordPress uses two methods to resize images – a “hard crop” method, and a “soft crop” (or “box resize“) method. The Medium and Large Sizes use the “box resize” method, which means that the image size is reduced until the largest dimension (horizontal or vertical) fits inside the “box” determined by the “Max Width” and “Max Height” settings. Let’s look at some examples…
Let’s say we upload an image which is 600px wide by 600px high, the created Medium Size image will be 300px by 300px. This makes sense, given the aspect ratio of 1:1. (See fig 1 below)

Fig. 1 Original image of 600px x 600px results in Medium Size image of 300px x 300px
However, if the Original image is 300px wide by 600px high, as the largest dimension in this case is the height, the image is reduced so that the height fits within the Max Height setting of 300px (in a default setup). The original aspect ratio is preserved, therefore the resulting Medium Size image will be 150px wide by 300px high. (See fig 2 below)

Fig. 2 Original image 300px x 600px results in Medium Size image of 150px x 300px
Similarly, if we assume that the Original image is 300px high by 600px wide, the Max Width setting sets the maximum dimension and therefore the resulting Medium Size image will by 150px high by 300px wide. (See fig. 3 below)

Fig. 3 Original image 600px x 300px results in Medium Size image of 300px x 150px
In other words, the original image is reduced until it fits inside the 300px by 300px “box” – hence the term “box resize”.
Significantly, the Thumbnail setting can either use the “box resize” method or, if the “Crop” box is checked, the “hard cropping” method, meaning that the resulting Thumbnail Size image will always be sized as per the specifed Width and Height settings. This means cropping will occur if the original image size has a different aspect ratio to that implied by the Thumbnail Width and Height settings. To use the “box resize” method, uncheck the Thumbnail “Crop” box.
What images does WordPress create during the upload process, exactly?
This depends on the size of the Original image…
- If the Original image is bigger than the Large Size dimensions set in the Media size options, 4 images will be saved on the server: a Thumbnail version, a Medium version, a Large version, and the original image itself.
- WordPress uses a downsizing function to create the Thumbnail, Medium and Large versions. WordPress never “upsizes” images – ie, it never creates a version larger than the original image size. Therefore, if the Original image is smaller than the Large Size dimensions, a Large Size version is not created.
- If the Original image is smaller than the Medium Size dimensions, neither Medium nor Large Size versions will be created.
- The Original image is identified as “Full Size” in the Media pop-up screen.
- The Thumbnail, Medium and Large Size images are named using the original filename plus the actual dimensions of the resulting image size. (See table below for examples.)
Default image sizes – dimensions and filenaming
As mentioned earlier, the dimensions of the resulting image sizes are appended to the Original file’s filename to create the filenames for the three sizes.
For example, uploading a 1200px x 1200px image named myimage.jpg will result in 3 files being saved in the relevant wp-content/uploads folder, in additional to the Full Size original:
- The Thumbnail Size version will be named myimage-150×150.jpg
- The Medium Size version will be named myimage-300×300.jpg
- The Large Size version will be named myimage-1024×1024.jpg
Note that, in the above example, the additional image sizes preserve the 1:1 aspect ratio of the original image (1200px x 1200px), which is why the dimensions of the resulting image appended to the original file name happen to correspond to the default Media sizes. In most real world examples the aspect ratio of the Original image will not be 1:1, meaning that the appended dimensions will be different to those shown above.
The following table gives some further examples for a variety of different original image sizes. In all cases, for simplicity, the examples assume the default Media sizes are used, as set in Dashboard > Settings > Media:
| Ex: | Original image dimensions width x height |
Default Media | Images created on the server |
|---|---|---|---|
| 1. | myimage.jpg, 1200px x 1200px | Thumbnail Medium Large Full Size |
myimage-150×150.jpg myimage-300×300.jpg myimage-1024×1024.jpg myimage.jpg |
| 2. | myimage.jpg, 900px x 900px | Thumbnail Medium Large Full Size |
myimage-150×150.jpg myimage-300×300.jpg – myimage.jpg |
| 3. | myimage.jpg, 500px x 250px | Thumbnail (crop unchecked) Medium Large Full Size |
myimage-150×75.jpg myimage-300×150.jpg – myimage.jpg |
| 4. | myimage.jpg, 1200px x 600px * | Thumbnail (crop checked) Medium Large Full Size |
myimage-150×150.jpg myimage-300×150.jpg myimage-1024×506.jpg myimage.jpg |
Some points to note:
- Ex.1: The original image is larger than the Large Size dimensions, therefore 3 additional image sizes are created by WordPress, in addition to the original image.
- Ex.2: The original image size is smaller than the Large Size dimensions, therefore no Large Size image is created.
- Ex.3: The original image size is smaller than the Medium Size dimensions, therefore neither a Medium nor a Large Size image is created. Only two images will be placed on the server – the Thumbnail and the Full Size (original) images. As the Thumbnail box is unchecked, the resulting Thumbnail size is proportional (ie “box resize” method”), which is reflected in the dimensions appended to this size.
- Ex.4: In this example the original image is rectangular (with an aspect ratio of 2:1), and we see WordPress preserves this aspect ratio during the downsizing. Note that the dimensions appended to the filename reflect the actual dimensions of the new images.
- Ex.4: This example assumes that the “crop” checkbox in the Media Settings has been checked. Therefore, for the Thumbnail Size, the original aspect ratio is ignored and a thumbnail of exactly 150px x 150px is created. If the checkbox is unchecked, the aspect ratio is preserved and the Thumbnail Size image will be, in this example, 150px x 75px.
Featured Image basics
Activating the Featured Image functionality
Featured Images are not enabled automatically. This functionality needs to be enabled in your theme, which you do by adding this code somewhere in your theme’s functions.php:
add_theme_support('post-thumbnails');
If you now go to the Post or Page Editor you should see a Featured Image box on the right hand side of the screen:

Featured Image box in Post/Page Editor
Click on the “Set featured image” link to launch the Media Uploader where you can either upload a new image and set it as the Featured Image, or select an existing image from the Post/Page gallery or Media library. Bear in mind that setting a Featured Image in the Post/Page Editor only registers a particular Original image as the Featured Image for that post – it doesn’t select any specific image size for display. Read on to learn more…
Displaying the Featured Image
The following function is used to display the Featured Image:
This code should be used in the relevant theme template within the Loop. More information about this function can be found on the Codex here.
Setting a default size for the Featured Image
By default, the the_post_thumbnail() function displays the registered “post-thumbnail” size of
your Featured Image. Please note that “post-thumbnail” is not the same thing as the Thumbnail Size that we discussed earlier. Yes, I know, this is confusing, just bear with me…
The “post-thumbnail” image size is registered using the set_post_thumbnail_size() function. This function takes 3 arguments: $width, $height and $crop_flag and, for example, is used in your theme’s functions.php like this if you want to specify a “post-thumbnail” size of 100px by 100px, with “hard cropping”:
set_post_thumbnail_size( 100, 100, true );
Our functions.php code now looks like this:
add_theme_support('post-thumbnails');
set_post_thumbnail_size( 100, 100, true );
Obviously, you don’t have to use 100px x 100px, so change the functions parameters to suit your theme layout/design.
If you don’t specify a “post-thumbnail” size using set_post_thumbnail_size(), the Original image will be displayed – which is probably NOT what you want. We’ll look at a better way of handling the display of Featured Images next…
Using add_image_size() to customise the Featured Image
As mentioned above, the set_post_thumbnail_size() function doesn’t, as at WordPress version 3.0.1, actually resize the image – it just resizes it in the browser. Although it is quite likely that on-the-fly resizing will be possible in a future version of WordPress, until this is implemented I don’t recommend using this function. Instead, I prefer creating any additional image sizes at the Media upload process, by using the add_image_size() function:
add_image_size( $name, $width, $height, $crop);
Once you have added this function to your theme’s functions.php your new image sizes will be created alongside the default Thumbnail, Medium and Large sizes during the Media upload process.
Configuring the add_image_size() function
Let’s take a closer look at this functions parameters…
- $name: a unique name for your image size, eg “Home page”, or “Archive page” or something similar
- $width: the width, in pixels, of this image size
- $height: the height, in pixels, of this image size
- $crop: true to indicate “hard cropping” or false to indicate “box resize”. Review this section of this article if you’re not sure of the difference between the two.
For example, to specify a new image size called “Home page”, sized at 120px x 120px, and hard cropped, this is what you would add to your theme’s functions.php:
add_image_size('Home page', 120, 120, true);
Or perhaps you prefer to create a new image size of 300px x 150px without “hard cropping”:
add_image_size('Special archive', 300, 150, false);
And, of course, there is nothing stopping you adding several image sizes, each of which will be used in different parts of your theme:
add_image_size('Home Top', 120, 120, true);
add_image_size('Home bottom', 270, 90, false);
add_image_size('Archive thumb', 150, 75, true);
add_image_size('Special', 397, 224, true);
Just remember that this code goes in your theme’s functions.php.
Displaying the additional image sizes in your theme
You can now reference these new additional image sizes in your theme template files using the the_post_thumbnail(); function discussed here, for example like this:
We should not forget about the default Media sizes either. You can display these in the same way, like this:
the_post_thumbnail('medium'): // The Medium Size version
Or this:
the_post_thumbnail('large'): // The Large Size version
Or this:
the_post_thumbnail('thumbnail'): // The Thumbnail Size version
Remember – this code should go within the Loop in the relevant theme template file.
The important advantages of going to all this trouble to create additional image sizes using add_image_size(), rather than use set_post_thumbnail_size(), are:
- add_image_size() creates an image at the correct size – no more browser resizing.
- You can use add_image_size() as many times as you like to specify a range of image sizes for use in your theme.
Dealing with images already on the server
The function add_image_size() will only create additional images for new uploads. Therefore, if you want to retroactively create the new additional images for previously uplaoded images, your best option is to use the rather wonderful Regenerate Thumbnails plugin. Highly recommended!
Examples using add_image_size()
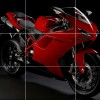
Finally, here is a series of test images to demonstrate the results of using various image sizes and, in particular, the two cropping options of the add_image_size() function.
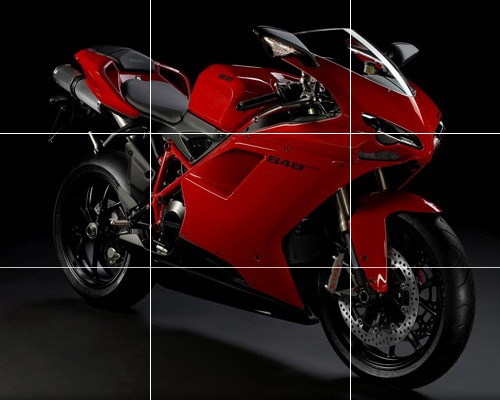
Each example shows the add_image_size() code used to generate the image. The Original image is 600px x 400px. Note “thirds” grid superimposed on the Original image to help indicate what has been cropped during the creation of various image sizes.
Original image
Original Size: 600px x 400px
Original Aspect ratio: 3:2

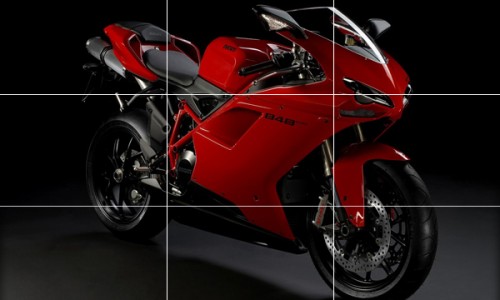
Added size: 500 x 500, hard cropped
Resulting Size: 500px x 400px
Resulting Aspect ratio: 5:4
Image has been cropped (left and right)
add_image_size( 'Test cropped', 500, 500, true );
Added size: 500 x 500, box resize
Resulting Size: 500px x 333px
Resulting Aspect ratio: 3:2 (same as Original)
Image has been resized to fit in “box”, original aspect ratio is preserved, not cropped
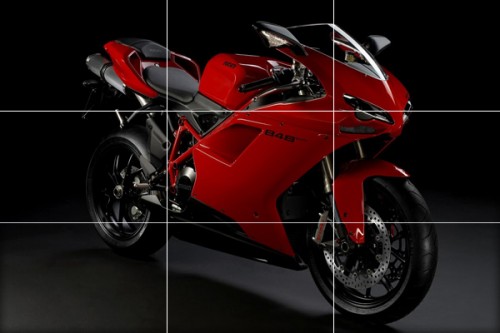
add_image_size( 'Test box resize', 500, 500, false );
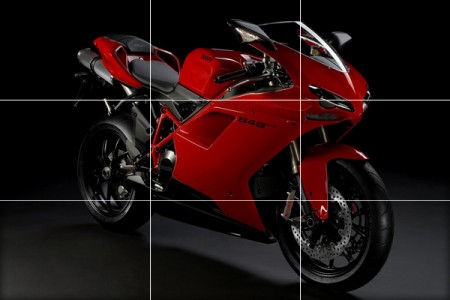
Added size: 500 x 300, hard cropped
Resulting Size: 500px x 300px
Resulting Aspect ratio: 5:3
Image has been cropped (top and bottom)
add_image_size( 'Smaller Test cropped', 500, 300, true );
Added size: 500 x 300, box resize
Resulting Size: 450px x 300px
Resulting Aspect ratio: 3:2 (same as Original)
Image has been resized to fit in “box”, original aspect ratio is preserved, not cropped
add_image_size( 'Smaller Test resize', 500, 300, false );
Added size: 100 x 100, hard cropped
Resulting Size: 100px x 100px
Resulting Aspect ratio: 1:1
Image has been cropped (left and right)
add_image_size( 'Thumb Test cropped', 100, 100, true );
Added size: 100 x 75, hard cropped
Resulting Size: 100px x 75px
Resulting Aspect ratio: 4:3
Image has been cropped (left and right)

add_image_size( 'Smaller Thumb Test cropped', 100, 75, true );
Added size: 100 x 75, box resize
Resulting Size: 100px x 66px
Resulting Aspect ratio: 3:2 (same as Original)
Image has been resized to fit in “box”, original aspect ratio is preserved, not cropped

add_image_size( 'Smaller Thumb Test cropped', 100, 75, false );
Conclusion
As can be seen from the above examples, choose your additional image sizes wisely in order to make sure you get the results you want.
Let’s finish by listing the key points to take away from all of this…
- You can easily customise the default Media sizes by changing the default sizes in Dashboard > Settings > Media.
- To use the Featured Image functionality, you need to add the add_theme_support(‘post-thumbnails’); code to your theme’s functions.php.
- Avoid using set_post_thumbnail_size() to set your Featured Image display size – to avoid in-browser resizing
- Add your own additional image sizes using add_image_size();
- Use the Regenerate Thumbnails plugin to create the new additional image sizes for images which already exist on your server
- Choose your cropping options wisely when using add_image_size();
- Use the “box resize” method if you want to preserve the original aspect ratio of your original image and not have it cropped.
Hope this is useful to someone – it took ages to write!
Enjoy!
Want to know how to stop WordPress from automatically creating default image sizes, ie the thumbnail, medium and large sizes, during the upload “crunching” process? Check out my new Remove WordPress default media image sizes article!
Related articles:
- Wordpress Featured Images - add_image_size() resizing and cropping demo
- Remove WordPress default media image sizes
- WordPress - List all image sizes in Media Uploader
Fatal error: Maximum execution time of 10 seconds exceeded in /home/www/3a8410dd1b3c6c449316434c21554b11/web/wp-includes/formatting.php on line 3775